
In this latest blog post, from Loop1 programming guru, and training instructor, Steven Klassen, learn the top 5 things you may want to consider as a new SolarWinds administrator.
So you have a new SolarWinds install and you’ve been handed the keys and the responsibility of monitoring all the things. You know there are probably some settings that should be given attention sooner than later, but which ones?
1. Set Your SMTP Information
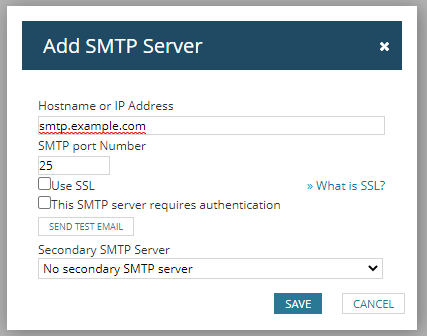
There are a lot of things that SolarWinds software will do out-of-the-box, but one of the most important is letting you know when things go wrong. To that end, you’ll need to make sure it knows how to get that information to you.
Under Settings > All Settings > SMTP Settings, you can tell the system where your SMTP server is, if it requires authentication, and from whom the emails should appear to be coming from. A common choice for this is solarwinds@example.com, where example.com is your company’s domain.

2. Customize Your Data Retention
How much data about your system monitoring do you want to keep? I know the answer is probably “well, all of it…” but realistically, you probably care about information that’s recent more than you care about what happened 3 months ago.
By default, SolarWinds stores 7 days of detailed data. That means every time your device is pinged, SolarWinds stores a pass/fail in the form of a 0 (it didn’t respond) and 100 (it responded). After 7 days, those get averaged at the one-hour mark. So after day 7, you can’t tell how the device was doing at the top of the hour versus the half hour because you have three values – the minimum, the maximum, and an average. The minimum and maximum are more interesting for things like latency and speed, but the average tells us, on average, how often it responded to ping. After 30 days, those averages to go to an entire day. So, make sure you’ve set your retention settings to support the maximum reporting requirement you’ll need. It’s not fun to have to generate a report and then realize after you need it that you don’t have enough data with the right precision.
You can find these settings under Settings > All Settings > Thresholds & Polling > Polling Settings.


3. Create a DeviceType Custom Property
Because SolarWinds is capable of monitoring so many types of devices, from servers to routers to fibre switches to UPSs, it’s important to be able to categorize them. Also because SolarWinds treats devices very generically (with some exceptions, like Cisco UCS and VMware) it doesn’t hazard a guess as to what “flavor” of device you’ve added.
Since that information isn’t assumed by the system, it’s good to have a custom property that can be set on each device or cluster of devices as they’re imported into the system.
Some good values for that custom property follow:
- Router
- Switch
- Power Supply
- Printer
- Server
- Environmental Sensor
Armed with this custom property, you can use it to customize the rest of your SolarWinds configuration. For example:
- View all your routers and switches only
- Limit an alert about your UPS devices to your facilities distribution list only
4. Create a THWACK Account
There’s nothing worse than working with software in a vacuum. While you’re working with SolarWinds software, you’re going to have questions. The resources I’m going to want to find immediately upon being put in charge of a new install are the following:
- Where can I learn more about this software?
- If I have a problem, who can I ask?


THWACK has you covered. There are forums for each of the products, and they’re well attended by SolarWinds administrators, hobbyists, and SolarWinds’s very own MVPs.
Besides product-specific forums, they have special areas for the API and labs for reporting and alerts because they got enough traffic that they were split off from the main content. Links are below to check those out, but don’t forget to create an account – that’s the only way you can contribute and take part in the conversation.
Important THWACK Links
Network Performance Monitor (NPM) Discussions
https://thwack.solarwinds.com/t5/NPM-Discussions/bd-p/npm-discussions
SolarWinds SDK Discussions (see next section)
https://thwack.solarwinds.com/t5/Orion-SDK-Discussions/bd-p/orion-sdk-discussions
All You Could Ever Want to Know About Reports
https://thwack.solarwinds.com/t5/Report-Lab-Discussions/bd-p/report-lab-discussions
Register for THWACKcamp 2020 – Nov 12-13
https://thwack.solarwinds.com/t5/THWACKcamp-2020/ct-p/thwackcamp-2020
5. Install SolarWinds SDK
Programming isn’t for everyone, that’s true. So it’s possible that you might have read about the SolarWinds SDK (software development kit) and passed right over it. What you didn’t see is that this software comes with an extra sharp tool called SWQL Studio (pronounced swickle).
If you’ve ever used SQL Studio from Microsoft to interact with a database, this utility won’t be too hard to get into your toolbelt. These are the major differences:
Entities vs. Tables
This is partly a naming convention and partly a functional one. In the database, your node information is in an appropriately-named table (okay, it’s actually a view) called Nodes. In SWQL, the same information can be found in the entity called Orion.Nodes. Your volume information is in a table called Volumes. In SWQL, it’s in Orion.Volumes. That’s great – are we just prefixing everything with Orion? No, but there is a search, so you can find the entity easily.
Select Star From Table
When you want to get to know a table and its contents, the DB wrangler in us all taps out the usual query:


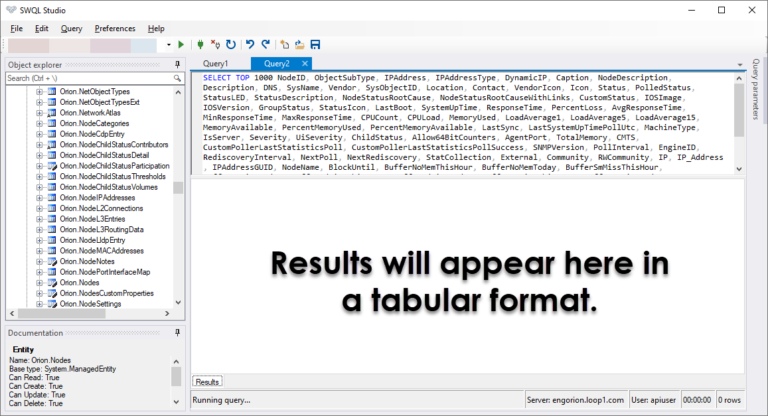
Not to worry, you can still double-click on the entity and get a tidy SELECT query with all the fields. From there you can whittle it down to just the fields you want.

JOIN vs. Navigation Properties
This is probably the very coolest difference between being thrown into a database you don’t know and working with SolarWinds data.
Usually you would have to know that a) two tables are related and b) that there’s a key between them that you can use to establish a relationship by way of some type of JOIN. With SWQL they curate these relationships for you. They’re represented here by these chain-link icons. The string to the left is the navigation and the bit in the parentheses is the actual entity. There may be some slight difference between them as is the case with ResponseTimeHistory (navigation property) and Orion.ResponseTime (the entity itself).
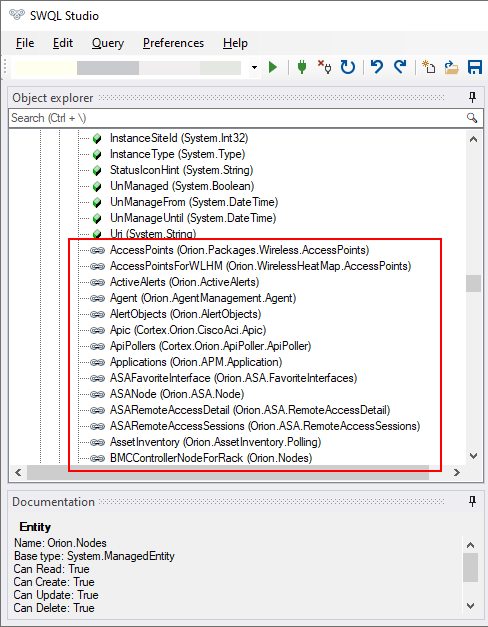

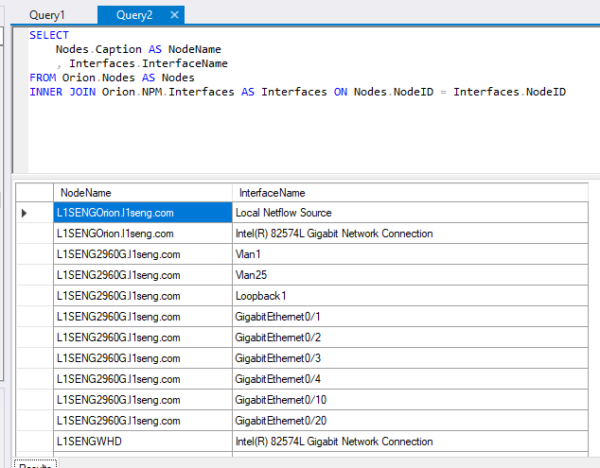
There will be a follow-up article that goes into using SWQL in more detail, but here’s a taste – we are working with the Orion.Nodes entity and we want to reach into the Orion.NPM.Interfaces entity only for the purpose of taking the InterfaceName field from that entity.

Summary
In this blog post you learned how to:
- Get automatic email SMTP notifications when things go wrong
- Make sure your reports have the data that they need
- Add extra information specific to your environment
- Get help when you need it (and share what you’ve learned) on THWACK
- Get the data back out of SolarWinds using SWQL
I hope you’ve enjoyed this blog and you’ll stay tuned for others that are coming soon.


Steven Klassen is a principal developer for Loop1, designing and developing SolarWinds integrations primarily in Go, PowerShell, Python, and JavaScript. He has more than 20 years of experience in software automation and technical training. He teaches public training classes on database design, queries in SQL and SWQL, and programming in Go, Python, and PowerShell. Steven developed and teaches the Loop1, 1-day virtual Solar Flare coder camp class.
Steven enjoys learning new programming languages, technologies, APIs, and just about anything else. His very favorite thing to do is breaking down a technical concept into easy-to-learn bits by spinning analogies. Steven likes to listen to music while he works, and that usually consists of whatever the Biebs has put out recently along with anything and everything written between ’84 and ’95.


